Author Archive
Rant: Google Photos
by BenV on Dec.08, 2024, under Morons, Software
Paying for storage
<google> Would you like to pay us monthly for storage?
<BenV> Uhhh, not really. That said, Google Photos is MIGHTY convenient. I’ll think about it.
You’ve got to admit that having an app on your phone that automatically uploads and lets you easily edit photos, make albums, share them, search through them is awesome. It’s part of what caused the silent decline of bringing a proper DLSR camera for me.
Of course Google getting you hooked by offering all this convenience for free up to a certain amount is one thing. Then after a number of years of use you’ll probably hit that 15GB (or whatever it is today) limit, triggering them to nudge you towards “For only $ per month you’ll get Y GB of storage!” (and continued service). Not a bad deal in my opinion, but I hate paying monthly subscriptions.
Initially I went along with it, but even before the first payment went through I was scouring for alternatives. Surely there should be an alternative?
Immich to the rescue
It didn’t take long to find Immich, which is basically the exact same thing, but hosted yourself. Advantages include “private” (no matter what Google tells me, I’ll never accept uploading anything means they won’t read it), having proper control, and it being free, apart from having to run your own server. If you don’t do that already, well, it’s probably going to end up more expensive. But I have servers, and the storage for photo’s isn’t that huge (at Google Photos it was 15GB, a single movie can be bigger these days).
Running Immich is fairly trivial as well, depending on what you have in place. In my case:
- Create /docker/immich/docker-compose.yaml, losely based on their docker-compose.yaml
- Expose this to traefik:
services:
  immich-server:
    container_name: immich_server
    image: ghcr.io/immich-app/immich-server:${IMMICH_VERSION:-release}
# stuff here
    labels:
    # Have Watchtower auto-update this, it's a choice ;)
      - "com.centurylinklabs.watchtower.enable=true"
    # Traefik routing
      - "traefik.enable=true"
      - "traefik.docker.network=traefik"
      - "traefik.http.routers.immich.rule=Host(`immich.junerules.com`)"
      - "traefik.http.routers.immich.entrypoints=websecure"
      - "traefik.http.routers.immich.tls=true"
      - "traefik.http.routers.immich.tls.certresolver=junerules"
      - "traefik.http.routers.immich.tls.domains[0].main=junerules.com"
      - "traefik.http.routers.immich.tls.domains[0].sans=*.junerules.com"
# other stuff
networks:
  traefik:
    external: true
    name: traefik
docker-compose up -d, we have a working https://immich.junerules.com (well, use your own domain :p)- Add
authentikin front, see https://docs.goauthentik.io/docs/install-config/install/docker-compose and https://docs.goauthentik.io/integrations/services/immich/ 
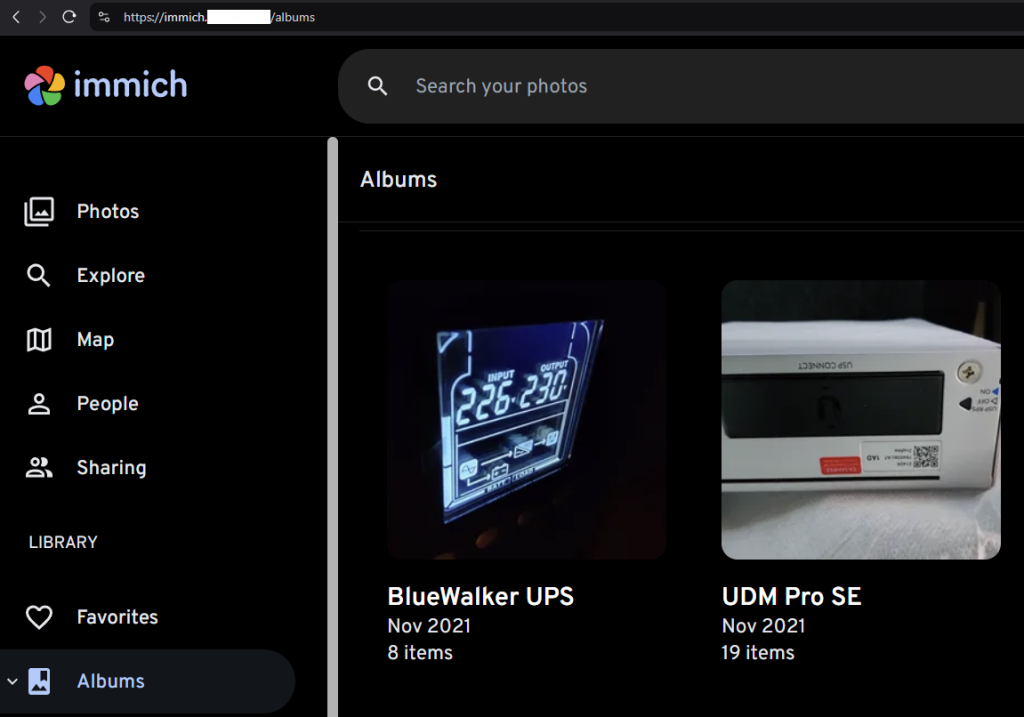
Great, so we’ve got a Google Photos replacement that’s (relatively) free. Comes with a phone app that’s almost the same too, excellent.
The Google Photos PROBLEM
Initially, things were smooth. Google has this awesome service to takeout your photos, simply go to https://takeout.google.com – state you want ALL your photos, 50GB zipfiles thanks, and a little later you’re downloading all your pictures including album info and metadata in a few big chunks.
Grab yourself a tool such as Immich-Go to import these (it’s straightforward – create api key, point to your zips, make sure it’s sane, run), and within a few hours you should have all your stuff imported into Immich. Yay!
Next: Removing your old photos from Google Photos. So this part certainly made me hate Google and their filthy $#%(^(*@#($*. *cough*
You’d think this would be the easy part. Just delete everything. “DELETE FROM table photos WHERE user_id = 'benv'", or rm -rf /photos/benv or one of many trivial options on the Google side of things. But noooo. Since this is that one thing that Google makes money off, they don’t want you to delete anything. So instead of giving a “remove my shit” button, even obscured somewhere, this is simply not possible. NOT POSSIBLE. You’d hope GDPR or one of the privacy “erase my data” laws would hit google with a 2-by-4, but nope. You see, there is a way: go to google photos, select your pictures one by one, hit trash button, hit confirm. WHAT.
In order to find a workaround, I figured I’d give ChatGPT a shot.
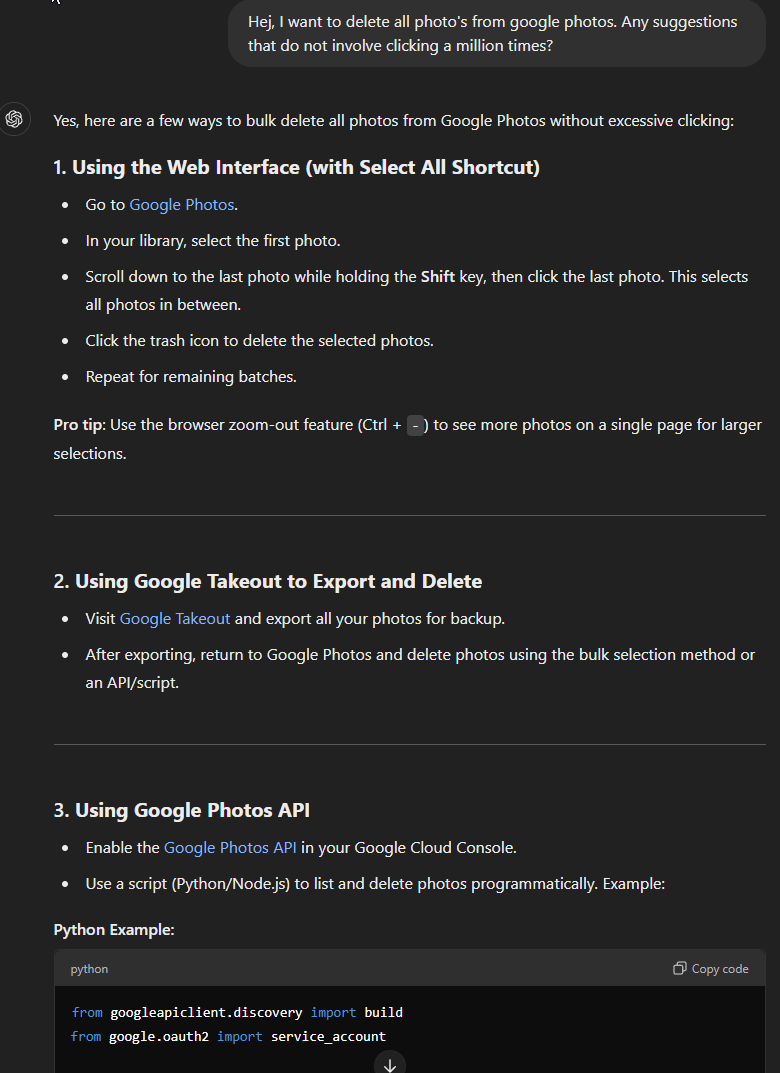
It comes up with some useless and non-existing options as usual (seriously, option 1 is exactly what I told it I did not want, and 2 isn’t even getting rid of photos), but the API variant sounds like a workable one. But it needs a key, so you go to the cloud console and enable it – https://console.cloud.google.com/marketplace/product/google/photoslibrary.googleapis.com
Then we need to create some credentials for the script. Then you realize another ChatGPT problem, it tries to use service account credentials, this won’t work according to the API docs:
So you think let’s go for an OAuth client instead, but that’s not really an option either anymore:
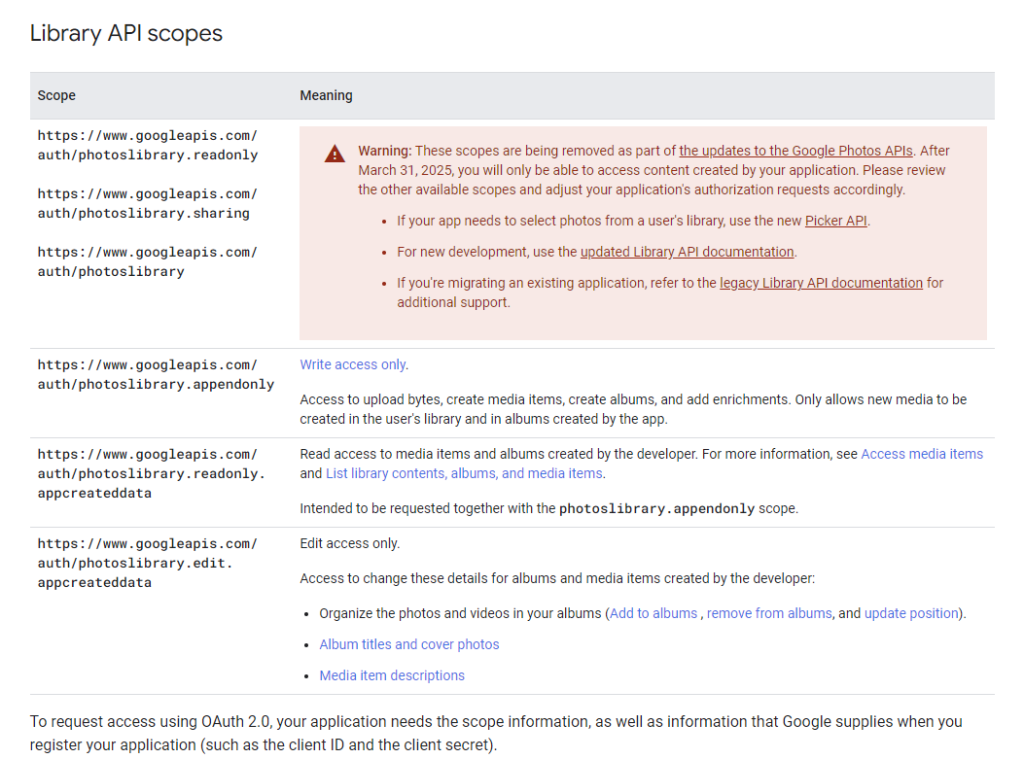
So given the above, it sounds a lot like the API will only allow you to mess around with photos you uploaded through that same API, but not manage the rest of google photos. Just great.
Or in their words:
SO WHERE IS THE FSCKING DELETE EVERYTHING BUTTON?!
I tried a Golang approach with ChatGPT as well, but given that there seems to be no workable API around (for long), I gave up on that as well. Too bad, wanted to make a go-photobomb app :p
The tedious workaround
So obviously while the trainwreck above hasn’t helped I still needed to get rid of the photos without clicking several tens of thousands times. I opted for the Tampermonkey approach:
Install tampermonkey, grab https://gist.github.com/sanghviharshit/59aa5615a9ec2dc548c23870e21ce069, adjust it until it works.
In my case I needed a small change: line 31 originally had if (d.ariaLabel == "Delete") {, which I needed to convert to if (d.ariaLabel == "Move to trash") { in order to match what the button actually said. Locale related probably. It might work for you, you might need to change languages. Another tweak I made was increasing the timeout values to delay the mainloop to every 60 seconds in order to have the delete complete before it tried reselecting/reloading.
After that, set your zoom-size to as small as possible, disable image loading through in the case of Chrome “Settings” -> “Privacy and Security” -> “Site settings” -> “Images” and add “photos.google.com” to the “Not allowed to show images”. It’ll speed things up.
Then you go to photos.google.com and wait while your tampermonkey script nukes the whole thing.
Tedious? Absolutely! This thing was stresstesting both Google photos as well as my network while digging through the deletes.
But we do have results:

Recommendation to Google
Please give people an option to simply delete everything. It saves you blogposts like this, as well as a ton of data traffic from your servers to me. Not to mention the horror stories my family are going to hear telling them to use my Immich server instead of your lock-in-a-tron.
What happened to “Don’t be evil” anyway?
Wireguard silently failing
by BenV on Jul.17, 2024, under Software
New Machine, New problems
One of my VMs has been running on ancient deprecated hardware for $forever now (without problems I might add), but after getting notice that it will be shutdown in 2 months together with an upgrade path that only costs me time and will result in double the specs, I decided to start the upgrade.
In order to do things properly, I started cobbling together some ansible roles for things I don’t want to repeat. One of these roles you can guess based on the title, wireguard. Needless to say things never work as you think they will, this is one of those stories.
Wireguard as point of entry
Given the SSH shenanigans ( CVE-2024-6387 ) that keep popping up (CVE-2024-6409) lately (CVE-2024-3094 as well this year), combined with the ease of exploitation, and constant port scans that have become snafu (even with fail2ban blocking countless IPs), I’ve finally decided to get rid of public SSH. If we need to run VPNs anyway, we might as well make that the only publicly exposed attack vector where possible and do the rest through internal networking. This will give the bonus that port 22 can turn into a honeypot, banning everything that tries to connect there.
Wireguard setup
My wireguard servers run through docker, specifically this one (with some local customizations to add some tooling). This allows me to have a .env file in my wireguard docker directory that has a PEERS=Peer1,Peer2,Jemoeder,Peer4 etc, and when restarting the docker it will create the peer configs for me.
The docker-compose.yaml looks a bit like this:
services:
  wireguard:
    image: linuxserver/wireguard
    container_name: WireGuard-Server
    cap_add:
      - NET_ADMIN
    environment:
      - PUID=420
      - PGID=420
      - TZ=Europe/Amsterdam
      - SERVERURL=your.mother.com
      - SERVERPORT=51820
      - PEERS=${PEERS}
      - INTERNAL_SUBNET=${INTERNAL_SUBNET}
      - ALLOWEDIPS=0.0.0.0/0
      - LOG_CONFS=true
    volumes:
      - /docker/wireguard-server/mounts/config:/config
    network_mode: host
    restart: unless-stopped
When peers are added, you’ll find yourself a directory like this:
$ ls -la /docker/wireguard-server/mounts/config
drwxr-xr-x 10  420  420 4096 Jul 14 17:46 ./
drwxr-xr-x  3 root root 4096 May 10  2023 ../
-rw-------  1  420  420  211 Jul 14 17:46 .donoteditthisfile
drwxr-xr-x  2  420  420 4096 May 10  2023 coredns/
drwx------  2  420  420 4096 Mar 18 11:26 peer_Peer1/
drwx------  2  420  420 4096 Mar 18 11:26 peer_Peer2/
drwx------  2  420  420 4096 Mar 18 11:26 peer_Peer3/
drwx------  2  420  420 4096 Mar 18 11:26 peer_Jemoeder/
drwxr-xr-x  2  420  420 4096 Jul 14 17:46 peer_Peer4/
drwxr-xr-x  2  420  420 4096 Mar 18 11:26 server/
drwxr-xr-x  2  420  420 4096 May 10  2023 templates/
-rw-------  1  420  420 1291 Jul 14 17:46 wg0.conf
With each peer having a set of files that are easy to use:
$ ls -la /docker/wireguard-server/mounts/config/peer_Jemoeder
drwx------  2 420 420 4096 Mar 18 11:26 ./
drwxr-xr-x 10 420 420 4096 Jul 14 17:46 ../
-rw-------  1 420 420  345 Jul 14 17:46 peer_Jemoeder.conf
-rw-------  1 420 420 1257 Jul 14 17:46 peer_Jemoeder.png
-rw-------  1 420 420   45 Mar 18 11:26 presharedkey-peer_Jemoeder
-rw-------  1 420 420   45 Mar 18 11:26 privatekey-peer_Jemoeder
-rw-------  1 420 420   45 Mar 18 11:26 publickey-peer_Jemoeder
Basically you can copy over that peer_Jemoeder.conf to the other host’s /etc/wireguard/wg0.conf, run wg-quick up wg0 and it should work.
Ansible role for wireguard
Of course this means setting up wireguard as client on all my machines that didn’t have it yet, so I need an ansible role to easily add these on both my local server and all the machines I would normally ssh to. As one does these days you let the boilerplate be coughed up by an LLM, hit it a few times with a stick to be more concise, jailbreak it to have it stop arguing about all the humans that will be killed as a result of this conversation, and at some point your junior intern might have generated something that you probably could’ve done yourself in the same time. However, rubber ducking does have its merits and I find it enjoyable at times 🙂
Long story short, I now have a role like this:
├── Makefile
├── README.md
├── group_vars
│   └── all
├── inventory
│   └── testhost
├── roles
│   └── wireguard
│       ├── defaults
│       │   └── main.yml
│       ├── tasks
│       │   ├── check_add_peer.yml
│       │   ├── configure_peer.yml
│       │   ├── main.yml
│       ├── templates
│       │   └── peer_config.conf.j2
│       └── vars
│           └── main.yml
└── site.yml
The concept being that I want to be able to run this for a random host and have it add a local entry in the peers, and generate the config file on the other end. It looked like this:
# roles/wireguard/tasks/main.yml
---
- include_tasks: check_add_peer.yml
- include_tasks: configure_peer.yml
  when: peer_added | default(false)
# roles/wireguard/tasks/check_add_peer.yml
---
- name: Read WireGuard server .env file
ansible.builtin.slurp:
src: "{{ wireguard_server_env_file }}"
register: env_file_content
delegate_to: localhost
- name: Parse PEERS from .env file
ansible.builtin.set_fact:
current_peers: "{{ (env_file_content['content'] | b64decode | regex_search('PEERS=([^\n]+)', '\\1')) | first | split(',') }}"
- name: Check if the new peer exists
ansible.builtin.set_fact:
peer_exists: "{{ wireguard_peer_name in current_peers }}"
- name: Add new peer if not present
ansible.builtin.lineinfile:
path: "{{ wireguard_server_env_file }}"
regexp: '^PEERS='
line: "PEERS={{ (current_peers + [wireguard_peer_name]) | join(',') }}"
when: not peer_exists
delegate_to: localhost
register: peer_added
- name: Restart WireGuard server container
ansible.builtin.command:
cmd: docker compose up -d
chdir: /docker/wireguard-server
when: peer_added.changed
delegate_to: localhost# roles/wireguard/tasks/configure_peer.yml
---
- name: Wait for peer configuration files to be created
ansible.builtin.wait_for:
path: "{{ wireguard_server_config_dir }}/peer_{{ wireguard_peer_name }}/peer_{{ wireguard_peer_name }}.conf"
state: present
timeout: 300
delegate_to: localhost
- name: Read WireGuard server configuration
ansible.builtin.slurp:
src: "{{ wireguard_server_config_path }}"
register: wg_server_config
delegate_to: localhost
- name: Extract peer IP address
ansible.builtin.set_fact:
peer_ip: >-
{{ (wg_server_config['content'] | b64decode | regex_findall('(?m)^# friendly_name=peer_' + wireguard_peer_name + '\n^PublicKey = .*\n^PresharedKey = .*\n^AllowedIPs = ([^/\n]+)') | first) }}
- name: Read WireGuard private key
ansible.builtin.slurp:
src: "{{ wireguard_server_config_dir }}/peer_{{ wireguard_peer_name }}/privatekey-peer_{{ wireguard_peer_name }}"
register: private_key_content
delegate_to: localhost
- name: Read WireGuard SERVER's public key
ansible.builtin.slurp:
src: "{{ wireguard_server_config_dir }}/server/publickey-server"
register: public_key_content
delegate_to: localhost
- name: Read WireGuard preshared key
ansible.builtin.slurp:
src: "{{ wireguard_server_config_dir }}/peer_{{ wireguard_peer_name }}/presharedkey-peer_{{ wireguard_peer_name }}"
register: preshared_key_content
delegate_to: localhost
# Figure out the name of this server
- name: Get Ansible control node hostname
ansible.builtin.command: hostname -s
register: ansible_control_hostname
delegate_to: localhost
run_once: true
changed_when: false
- name: Set fact for Ansible control node hostname
ansible.builtin.set_fact:
ansible_control_short_hostname: "{{ ansible_control_hostname.stdout | lower }}"
- name: Generate WireGuard peer configuration
ansible.builtin.template:
src: peer_config.conf.j2
dest: "/etc/wireguard/wg-{{ ansible_control_short_hostname }}.conf"
owner: root
group: root
mode: '0600'
vars:
wireguard_private_key: "{{ private_key_content['content'] | b64decode | trim }}"
wireguard_public_key: "{{ public_key_content['content'] | b64decode | trim }}"
wireguard_preshared_key: "{{ preshared_key_content['content'] | b64decode | trim }}"
wireguard_peer_ip: "{{ peer_ip }}"
# roles/wireguard/templates/peer_config.conf.j2
#############################
### {{ ansible_managed }} ###
#############################

[Interface]
# Name = {{ wireguard_peer_name  }}
Address = {{ wireguard_peer_ip }}
PrivateKey = {{ wireguard_private_key }}

[Peer]
# friendly_name=peer_{{ wireguard_peer_name }}
PublicKey = {{ wireguard_public_key }}
PresharedKey = {{ wireguard_preshared_key }}
Endpoint = {{ wireguard_peer_endpoint }}
AllowedIPs = {{ wireguard_peer_allowed_ips }}
PersistentKeepalive = 25
The vars files are boring enough:
# roles/wireguard/defaults/main.yml
---
# Defaults for wireguard
wireguard_peer_dns: 0
wireguard_peer_endpoint: "your.mother.com:51820"
wireguard_peer_allowed_ips: "192.168.123.0/24"
# roles/wireguard/vars/main.yml
wireguard_server_env_file: "/docker/wireguard-server/.env"
wireguard_server_config_dir: "/docker/wireguard-server/mounts/config"
wireguard_server_config_path: "{{ wireguard_server_config_dir }}/wg0.conf"With a test inventory file we can now go ahead and see if it works for our new host.
# inventory/testhost
ungrouped:
  hosts:
    new.testhost.com:
      # Temp IP override while provisioning new host
      ansible_host: 123.123.123.123
      ansible_ssh_private_key_file: /home/ansible/.ssh/id_ecdsa
      ansible_user: ansible
      ansible_become: true
      wireguard_peer_name: TestHost
Result? It works! Or does it….
Ansible results
Of course this went back and forth with the LLM a few times, but it did well. The new peer was generated by the docker, the config was parsed and the template spit out to the new test host. This test host was running Centos 9 Stream, (don’t ask – Slackware and Arch weren’t options), but wireguard-tools were installed, the kernel module loaded, and we now had a /etc/wireguard/wg-jemoeder.conf (since my server is called jemoeder obviously). Nice. And it looked good too:
# /etc/wireguard/wg-jemoeder.conf
#############################
### Ansible managed: peer_config.conf.j2 modified on 2024-07-14 18:02:45 by root on jemoeder.example.com ###
#############################

[Interface]
# Name = TestHost
Address = 10.20.50.6
PrivateKey = APcRD9qFTJzM5pNNd4s4yVmeLO8er5R61oLb1DNmT0k=

[Peer]
# friendly_name=peer_TestHost
PublicKey = 0eGCaYbRJMxDBPlUVKdEw53ucmapD3rQ3udh9cg/oEo=
PresharedKey = gg+1LT2erQng12eELThRfuP0yKt1niAStl2eCWQjQ34=
Endpoint = your.mother.com:51820
AllowedIPs = 192.168.123.0/24
PersistentKeepalive = 25
Great! Time to start it up:
$ wg-quick up wg-jemoeder
[#] ip link add wg-jemoeder type wireguard
[#] wg setconf wg-jemoeder /dev/fd/63
[#] ip -4 address add 10.20.50.6 dev wg-jemoeder
[#] ip link set mtu 1420 up dev wg-jemoeder

$ wg show
interface: wg-jemoeder
  public key: 0eGCaYbRJMxDBPlUVKdEw53ucmapD3rQ3udh9cg/oEo=
  private key: (hidden)
  listening port: 44516

$
Uhhhh….. where is my peer?
Wireguard bug
So what do we see?
- Wireguard came up
- No errors returned
- No errors or warnings in dmesg
- wg-jemoeder interface is there with the correct IP
- No new routes
- No peers, not even with
wg show dumpor other commands
After jumping high and low, manually running wg set commands and variants, tcpdumping, turning on kernel module debugging and going absolutely crazy for a long time, troubleshooting with LLMs which provide the usual “have you tried turning it off and on again” and “maybe you’re special, try starting from scratch” and “have you checked your wg0 config file for syntax error”, running wg through strace and seeing no errors, and scouring the internet for similar problems, there was no solution in sight.
“Well, dear BenV, what was the outcome of the battle then, certain defeat?!”
Of course not. After raging for a while and tinkering with various bobs of the config, it finally struck me. Turns out the `PublicKey` that our ansible role picked up was indeed a public key…. just the wrong one – its own instead of the server’s key.
UGH.
# in ansible roles/wireguard/tasks/configure_peer.yml

- name: Read WireGuard SERVER's public key
  ansible.builtin.slurp:
    src: "{{ wireguard_server_config_dir }}/server/publickey-server"
  register: public_key_content
  delegate_to: localhost
This makes ansible read the correct public key (that the server uses) as opposed to the client’s own key, and after re-running the playbook it works like a charm.
Conclusion
Is this a bug? In my opinion it is, although I can see the confusion on the wireguard side of things where it matches it own keys and somehow deals with it, but as a user this is unacceptable behavior.
I’m defining a [Peer] block, not my own interface, so it should treat it as a foreign entity. If the key matches its own public key it should complain. Is it user error? Of course, but that doesn’t mean it shouldn’t help the user out.
Would this have happened without the use of LLMs as a junior? Probably not, but then again, maybe it would (copy paste has the same effects, the 3 keys would have been copy/paste snippets even when manually writing). That said, this is still on you, Claudippityard….. :p
OCSP messing up your day?
by BenV on Jan.21, 2018, under Software
I had a few people complain about their favorite browser showing an error such as:
“Invalid OCSP signing certificate in OCSP response. (Error code: sec_error_ocsp_invalid_signing_cert)”
Or maybe like this:
Secure Connection Failed

An error occurred during a connection to notes.benv.junerules.com. Invalid OCSP signing certificate in OCSP response. Error code: SEC_ERROR_OCSP_INVALID_SIGNING_CERT

    The page you are trying to view cannot be shown because the authenticity of the received data could not be verified.
    Please contact the website owners to inform them of this problem.
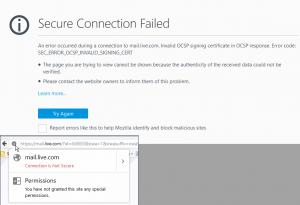
This was when they were going to a website that I host on my apache server that also serves this blog.
Knowing that my apache configuration is near perfect (*cough*) – at least, ssllabs.com gives this server at least an A rating – I wondered what was up with Firefox now.
At least, when testing the site in Google Chrome it worked fine.
Turns out that someone did the work for me:
Hanno Böck wrote a detailed post about the issue. Thanks Hanno, time to tweak some apache configuration and hope that Firefox steps up their game.
Thanks Hanno! 🙂
Check_MK IRC_Notify new version
by BenV on Dec.04, 2016, under Software
Folks,
This weekend I found some time to upgrade my little Check_MK Notification bot a bit.
After a good fight with the perl POE framework and learning a thing or two (teaching me the price of not using my own proven bot framework :p) I did manage to get some new features built into the bot.
This bot has been in use by me and the company I work at for about a year now, proving to be a nice to have notification channel.
One of the things that sometimes annoyed me was when someone would put a ton of services in downtime – or when something really breaks and a ton of alerts go off that the bot(s) would spam tons of messages for a while. This lead to the first new feature called MUTE.
The bot can be silenced for a custom amount of time (defaulting to 5 minutes if you omit it) by simply saying “mute” to it. See the screenshot below for a demonstration.
If you feel lonely immediately after this or botched the time you can use unmute to immediately cancel the mute.
Another nice new feature are filters. The command “problems” would already show -all- problems, but I implemented a filter feature so now you can also search for specific host issues or maybe issues for a specific contact group such as “SLA”.
For example, you can now ask the bot: problems host=web;contact=SLA and it will return all hosts that report to the SLA contactgroup and have web in their hostname.
Following up on this, it is now also possible to acknowledge all these problems using the same filter technique by issuing a command like ack all host=web;contact=SLA || We are fixing stuff. Useful filter columns right now are host_name service_description notes comments contact_groups, but the filter matches on a partial key.
If you don’t feel like typing a key since you have a specific enough keyword to search on you can also simply filter like this: problems webserverhost.name which will search in both host and service names, notes, and comments.
Another itch that needed scratching was the need for multiple IRC connections. These days we use Slack in addition to other communication tools, so a lot of colleagues are no longer found on IRC but only linger on for instance Slack. Previously this meant either the bots were no longer seen, or you needed to run it twice.
Well, the bot can now make multiple IRC connections! 🙂
Simply add another [irc] and [channels] block with a (unique) number appended to it and the config parser should add a connection.
Because I wanted to have Slack working I also added support for IRC server Username and Password, but do note that I needed to set the nickname to username to get Slack to accept the connection. Also be mindful of the channels that the user you use for the bot may automatically be subscribed to, since it will report to -all- of the channels it is in.
NEW (version 1.3a): Unless you set the regonly option to 1 in the configuration file for that IRC connection. This option will make the bot ignore channels that are not in the channel list in the configuration file. Very useful for Slack and Bitlbee etc.
Here’s a screenie to show off some of the new things:
Obviously there are a bunch of fixes and improvements (*cough*) in the new version as well, so new bug reports are welcome 🙂
The new 1.3a version can be downloaded here:
irc_notify-1.3a.mkp (28655 downloads)
SHA1: 26efbb637c4b69adaec1418f5b3b8b0b8bb86927 MD5: 51779dac78d5efeb39315c2ef03be41b
It should also be up soon on the Check_MK Plugin exchange soon:
irc_notify
Check_MK plugin: MTR for pretty ping graphs
by BenV on Dec.31, 2015, under Check MK
Another day, another Check_MK plugin!
This one is inspired by smokeping, but different because it doesn’t need smokeping. It does need the tool formerly known as Matt’s TraceRoute, aka mtr. It’s installed on all my machines by default and easily available in all distro’s that are worthy. Even pokemon OS has it 😉
The reason I wanted to build this plugin was first of all because of pretty graphs (of course!). The second reason was that my girlfriend had some network issues to figure out, but only ping and DNS resolve times don’t paint a complete picture. This plugin makes some graphs that hopefully fill that void a bit 🙂
Now that you’ve skipped the last 2 paragraphs, here are some example graphs that I made while testing the plugin:
This is the plugin status per host on the service overview page of Check_MK. As you can see I configured multiple hosts. (continue reading…)
Check_MK Custom Notifications — IRC
by BenV on Oct.27, 2015, under Check MK
One of the cool things Check_MK offers these days is the option for custom notifications. Email notifications are of course fine, but a lot of people are also interested in Pagerduty or their own SMS service or whatnot. Personally I was interested in an IRC based notification system where alerts would simply be sent as a message into a specific channel on my IRC server.
Let’s see how we can implement that 🙂
(continue reading…)
Slackware-current and a dedicated Terraria Server
by BenV on Jun.30, 2015, under Software
With the v1.3 patch coming soon ™, hopefully today, it’s time to play Terraria again! 🙂
One of the claims is that it will now be easier / at all possible to run multiplayer games through steam. Well, we’ll see about that, but I figured this would be a great time to get my own dedicated headless server up and running. (continue reading…)
Nullmailer check_mk plugin
by BenV on Mar.20, 2015, under Check MK
Here’s another small plugin for Check_MK – this one keeps track of Nullmailer queues.
Without further delay, here’s the package:
[Download not found]
[Download not found]
For installation check out one of my older plugin posts 😉
Have fun with this new plugin! 🙂
ChangeLog:
V1.1: Updated agent to check different queue location for Debian etc. No other changes.
V1.0: Initial version
Slackware current upgrades readline library
by BenV on Feb.27, 2015, under Software
Surprise, surprise, something broke with the readline library upgrade 😉
While upgrading my slackware(64)-current installation today, this happened:
Verifying package readline-6.3-x86_64-1.txz.

Installing package readline-6.3-x86_64-1.txz:

PACKAGE DESCRIPTION:

# readline (line input library with editing features)

#

# The GNU Readline library provides a set of functions for use by

# applications that allow users to edit command lines as they are typed

# in.  Both Emacs and vi editing modes are available.  The Readline

# library includes additional functions to maintain a list of previously

# entered command lines, to recall and perhaps edit those lines, and

# perform csh-like history expansion on previous commands.

#

Executing install script for readline-6.3-x86_64-1.txz.

Package readline-6.3-x86_64-1.txz installed.
Package readline-5.2-x86_64-4 upgraded with new package ./readline-6.3-x86_64-1.txz.
awk: error while loading shared libraries: libreadline.so.5: cannot open shared object file: No such file or directory
Package: btrfs-progs-20150213-x86_64-1.txz
‘/mnt/general_stores/OS/Slackware/slackware64-current/./slackware64/a/btrfs-progs-20150213-x86_64-1.txz’ -> ‘/var/cache/packages/./slackware64/a/btrfs-progs-20150213-x86_64-1.txz’
‘/mnt/general_stores/OS/Slackware/slackware64-current/./slackware64/a/btrfs-progs-20150213-x86_64-1.txz.asc’ -> ‘/var/cache/packages/./slackware64/a/btrfs-progs-20150213-x86_64-1.txz.asc’
awk: error while loading shared libraries: libreadline.so.5: cannot open shared object file: No such file or directory
ERROR - Package not installed! gpg error!
awk: error while loading shared libraries: libreadline.so.5: cannot open shared object file: No such file or directory
Hmz, seems like awk (which is actually gawk) hasn’t been updated yet, yet it still links to the old libreadline (5).
This in turn breaks loads of things, so while packages are still being rebuilt / link to the old libreadline this might be a good idea for now:
# This is for slackware64, drop the 64 if you run an ancient machine / install.

root@slack64:~# ln -sf /usr/lib64/libreadline.so /usr/lib64/libreadline.so.5

root@slack64:~# ln -sf /usr/lib64/libhistory.so /usr/lib64/libhistory.so.5
Fixed for now 🙂
(Visma)’s AccountView and upgrades
by BenV on Feb.18, 2015, under Software
If you’ve ever had the burden of being an admin of an office with imbeciles that use AccountView you probably already lost a bunch of hairs over it, if it didn’t push you to angry KILL CRUSH DESTROY mode (yet). Fortunately my encounters with the product are usually only in the form of “kill -9 hanging task AVWIN.EXE” or “recover from last night’s backup“. (when will those idiots start using a real database as backend instead of those easily corrupted DBF/CDX files…. idiots. Then again, the horrible garbage still uses FoxPro, so color me surprised.)
Today my boss forwarded me an email with the corresponding ‘Here, update instructions, go fix!‘ command. After a few sighs, a download and a backup of the current installation (version 9.2) I went to work.
Start the installer, next a few times, point it to the old … wait, why can’t I select the network folder that we have the old one installed on?
Apparently since version 9.3 you can’t select non local folders anymore, no matter if you select the server/standalone/workstation install.
Giving it a mapped folder location like “Y:\AccountView9” resulted in a no such location or permission denied message.
Great.
Just great.
But then I got this idea: What if I give it a symlink on a local folder?
C:\Users\Administrator> mklink /D "C:\AccountView9" "\\192.168.1.2\AccountView\AccountView9"

symbolic link created for "C:\AccountView9" <<==>> "\\192.168.1.2\AccountView\AccountView9"
Next I went through the 9.4a installer again and pointed it to the C:\AccountView9 symlink. Result?
“SURE THING! Did you know that there’s an old installation in that folder?”
Ha. I WIN 😉

